As spring comes along, the bait we call a “Nedina” (a fat ned worm with a skirt) starts to fly out of the shop. We get more orders for this bait in the spring than for most others. But it is a good bait to use all year round. It looks somewhat like a cross between a fat stick worm and a skirted grub – and it is.
This is a bait that has not gotten a lot of attention of late, but one that some anglers swear on. It is as versatile as a normal stick worm and can be fished weighted or weightless. When rigged weightless, it can easily be skipped up under docks. Because of the size of the bait itself, it skips great, allowing an angler to make long casts up under docks to get to those fish other anglers miss.
This bait can be Texas rigged, used on a Carolina rig or even a shakey head. Obviously, it can even be put on a ned rig. The bait is soft, so it gets out of the way easier than one would think, leaving just the hook to get into the fish’s mouth. When fishing a shakey head, I prefer a football shakey head. It gives any bait a bit of a different action. Yes, it does get snagged up more in vegetation than a round shakey head. But I have found a good number of my bites come when I jerk the bait through the weeds hard enough that I clear the weeds from the bait. It seems to be something smallmouth in particular cannot stand and will trigger them to strike. A shakey head is my go to when things seem to get tough, and the Nedina is my newest favorite bait on that head.
A swing head can even be a great choice for our Nedina. Rig the bait with the skirt toward the back and try changing up the retrieve. It can be dumped along the bottom. It can be dragged or hopped. Even swimming it back to the boat at different depths in the water column can trigger strikes.
The direction in which to rig the bait when Texas rigging or using it weightless is a matter of personal preference. One thing I always pass on, though, is pegging the sinker if I have a weight on it. This allows both the weight and the bait to move up the line, out of the way of the hook. Some rig the bait with the “head” of it at the eye of the hook. I like to rig it with the skirt forward. Some people call this reverse rigging. In Japan they call it the back-slide setting.
Here is the thing with the back-slide setting. When we fish a Texas rig into cover, we pitch it into the cover and let it fall. When I pitch the Nedina with the skirt toward the eye of the hook, it does, essentially, “slide back.” I pitch it on a slack line and let it slide backward into the cover. This allows me to pitch at the edge of the cover and have the bait still get into it. It is a different presentation, and I think that is why it works so well. It is something fish do not see as often, so it piques their curiosity. I can also skip it along the edge of the cover and have it slide backward down into the sweet spot.
The Nedina is a great bait for many different situations. But, as I said, it seems to be one that has lost popularity in the last several years or more. It can offer a presentation that may just be different enough to get strikes on days when other option fail.
Of courses, when we eat better, we generally feel better. A lot of people may not know this, but I love smoothies and green drinks. They are healthy and I enjoy not only making, but drinking them. For years I used either my blender or, more often, my food processor, to make these drinks. Cleaning either one of those things is a bit of a pain, so I didn’t create green drinks or smoothies as much as I would have if there had been an easier option.
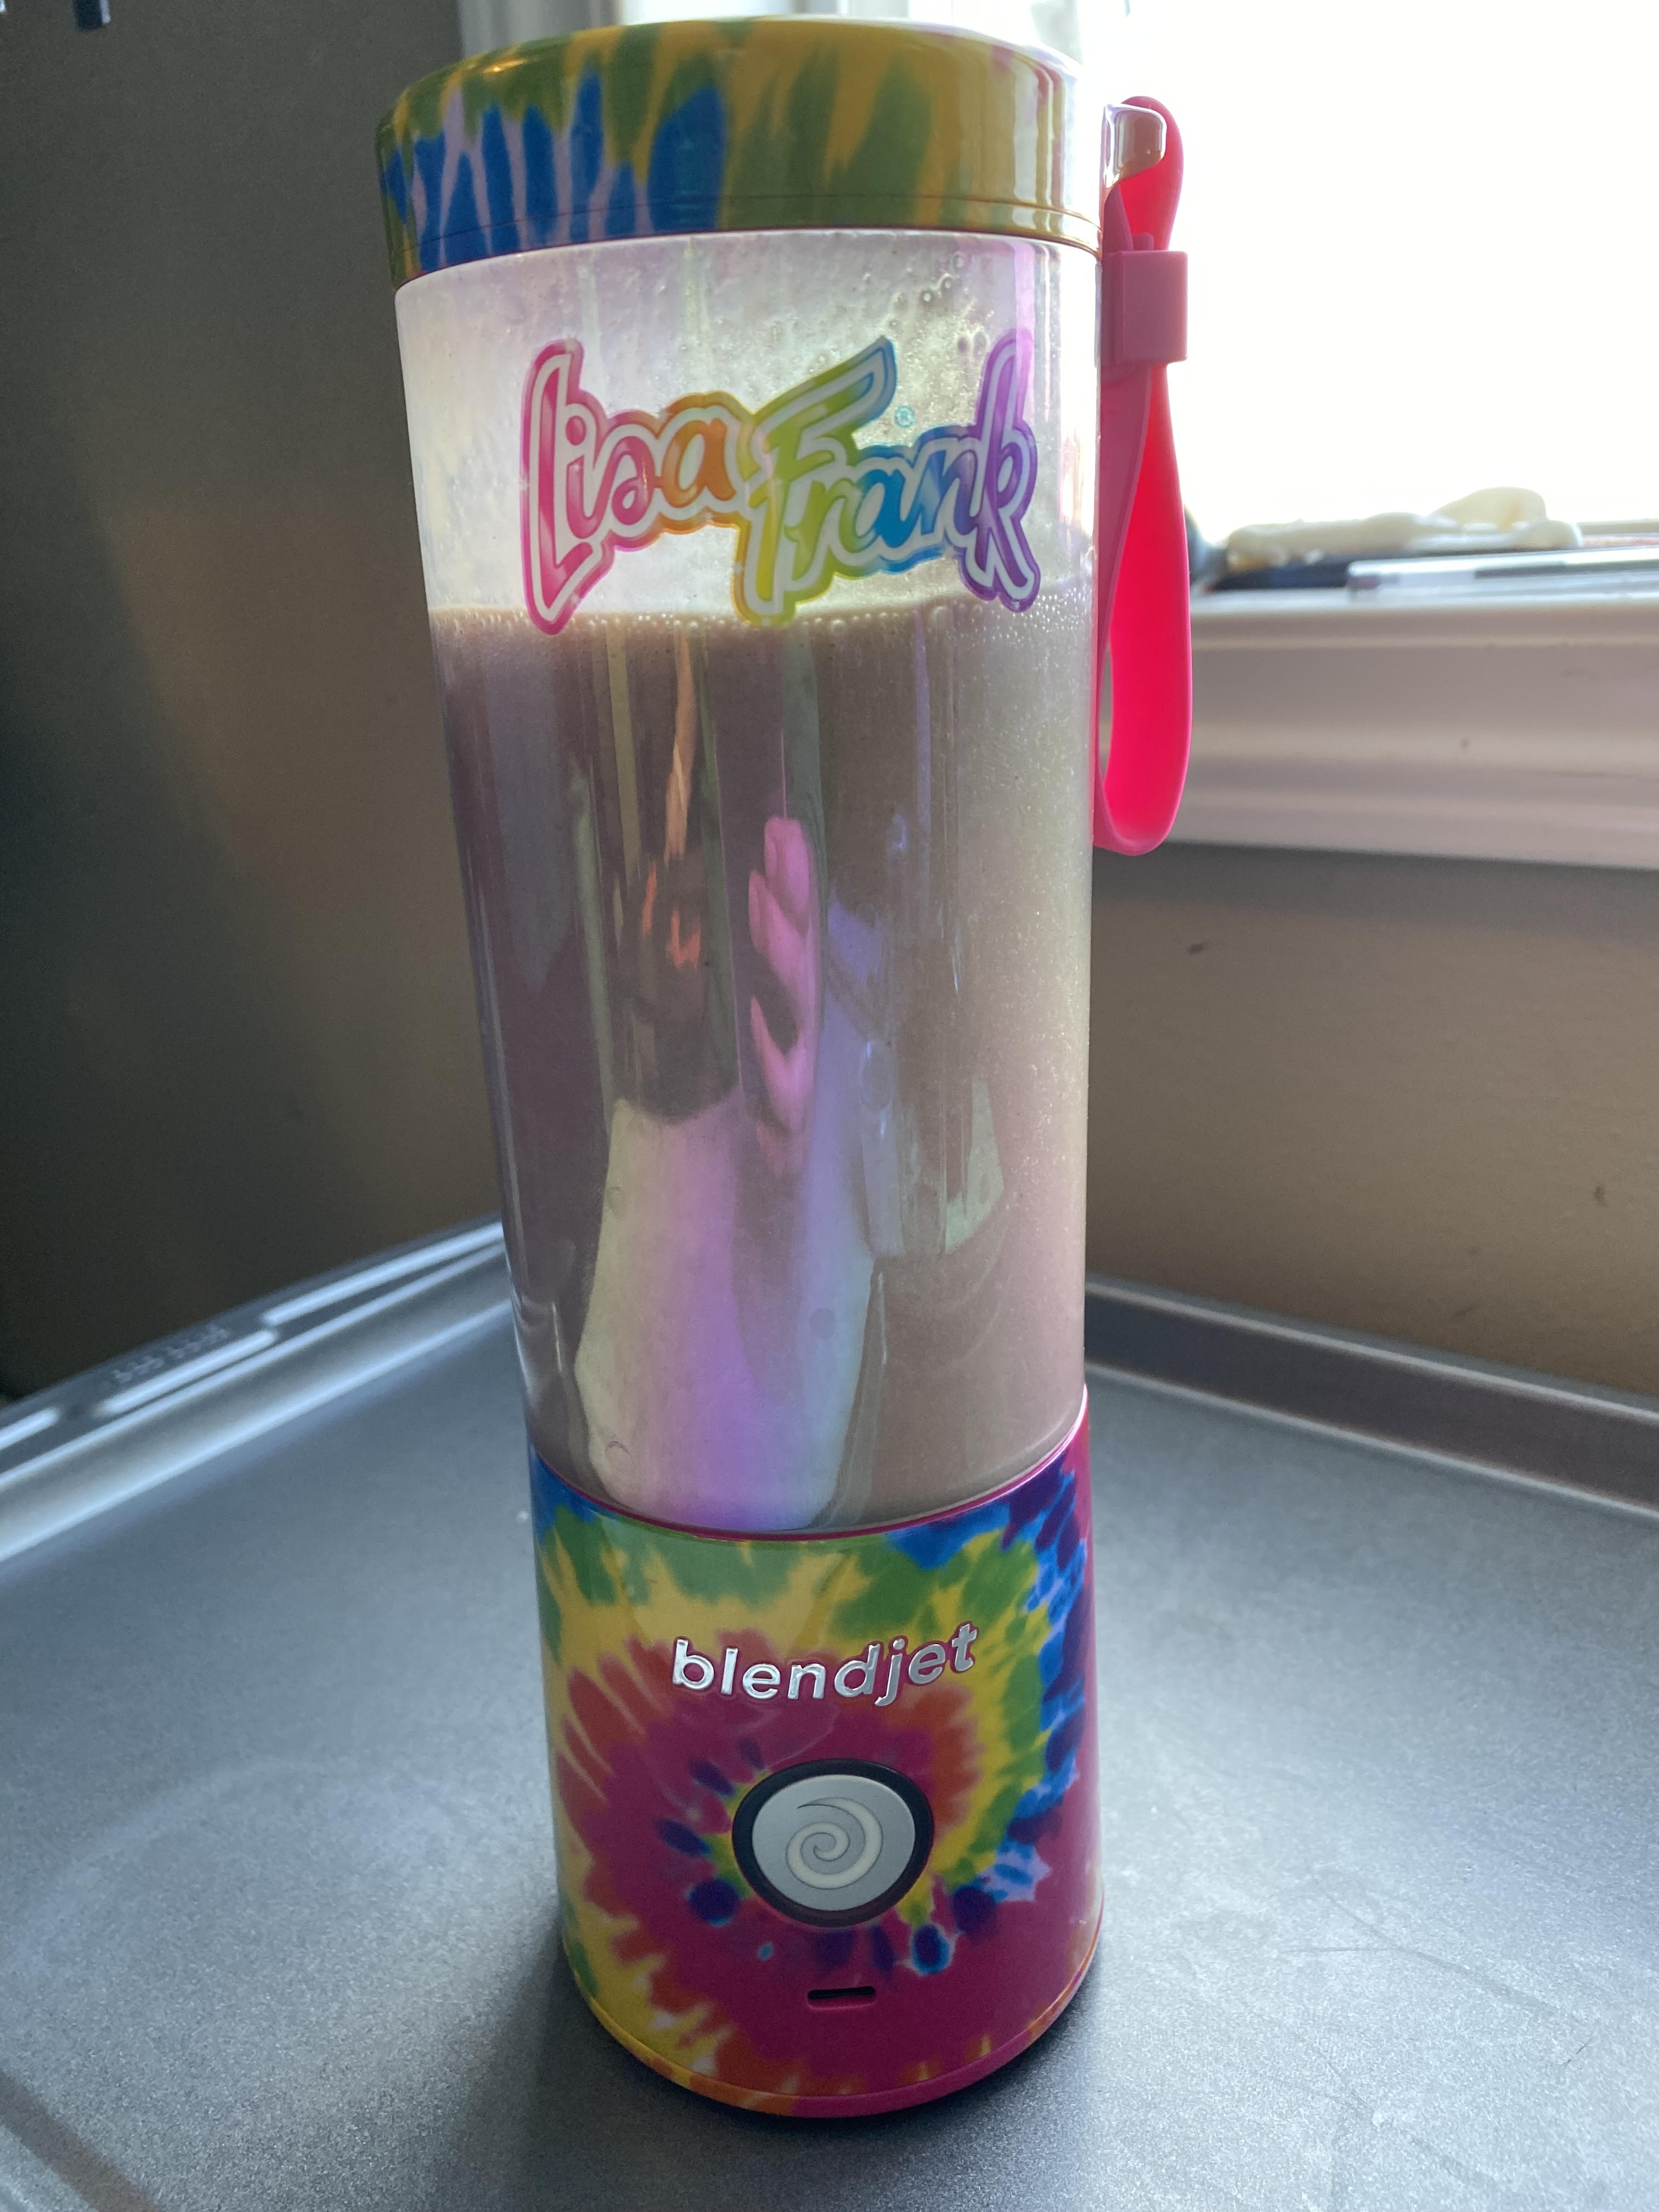
I had been seeing advertisements for this handheld blender called BlendJet. The idea intrigued me, but I did not pull the trigger on buying one. A couple of weeks ago I got an email from a guy telling me he would provide me with a BlendJet if I would review it. And I am happy I accepted. I have not been paid for this review, but, in the interest of full disclosure, I did receive a review blender to try out.
The thing that interested me first was the idea of having a handheld blender that I could take anywhere with me. It does not need to be plugged in. It charges via USB. That means I can charge it from my laptop, my truck, or anywhere else I have power and a USB. I feel like that’s pretty convenient. And it holds a charge for a good amount of time. Unfortunately, I did not count the number of times I blended with it up until now, but I know it was a bunch. They say it can be used to blend 15 times before it needs recharging (which can take just over an hour), and I would venture to guess that is pretty accurate, at least from what I’ve seen.
Now let’s get to the actual blending. What I love most about this thing is that no matter what you put in it, it will blend fully and completely. I was amazed at first. When I really looked at it, the blending blades – which are super sharp and look exactly like small blender blades – are offset to one side. I feel like this is what creates the complete blending effect. However they do it, it is great to not have to stop the blender, push down anything that is on the sides or the top, etc. There is none of that with BlendJet. In 20 seconds, anything I have put in it has blended. Berries, bananas, any kind of fruit, really. I’ve made smoothies with water and with almond milk. I even made a blended margarita in it the other night. Those little blades shred the ice in short order, giving you a smooth, blended drink.
Now for cleanup. It really could not be easier. All you need to do is fill it about 2/3 to ¾ of the way up with hot water, add a drop of dish washing liquid, secure the lid and hit the blend button. Twenty seconds later the soapy water has cleaned the blender completely. In a pinch, let’s say if you are out somewhere and don’t have access to dish soap, just use water and rinse it out completely and it will be ready to go again the next time you need it.
Overall, what do I think of BlendJet? I think it’s a great little device and odds are good I will own more than one of them. The one I was sent was a Lisa Frank edition, which is super fun with its multi-colored outside and holographic clear blender compartment. There are three different designs in the Lisa Frank line, but there are also many other solid colors a person can order. They even have an insulated sleeve to put around the BlendJet to keep your smoothies cold for later drinking. (pro tip – if your smoothie starts to settle, just use the “pulse” feature to give it a quick stir)
I should also add that BlendJet sells what they call Power Packs. These are smoothie packs. They have regular smoothies, protein smoothies and a new latte smoothie line. I will be trying all of these in the coming months if anyone is curious about them. They cut out looking for a recipe or trying to remember how the last one was made etc. All you have to do is dump the smoothie mixture into the BlendJet with your favorite milk or, if you do not have or like milk, you can use water, and blend. Boom. It is done. And did I mention – it makes great blended margaritas?
This 4-inch shad single tail grub is just one of the many grub options available to anglers
Grubs come in all sizes. We sell single tail grubs from one inch to five inches, but there are several bigger ones on the market as well. They are another versatile bait. They can be fished anywhere in the water column. They can be fished weightless and burned across the top of the water much like a wake bait, and they can be put on a jig head and slow-rolled across the bottom, or used anywhere in between. Some grubs have ridges and can be very thick. Others are smooth-sided and thinner, such as our four-inch shad grub. They can all be used for any application, really, and offer the angler a variety of actions for a variety of situations.
For smaller grubs, I use a medium weight spinning rod. For those with super heavy hook sets, a medium light might be better, but I get away with a medium, so I have not bought a rod especially for that application yet. It’s up to each individual angler to determine what works best for them, and if the expense of an entirely different set up is worth it.
For small and weightless grubs, it is a good idea, I feel, to have a spinning reel with a large capacity. This will allow for longer casts with a bit more ease. I like the bigger spool not only for throwing a weightless grub, but also for throwing a split shot grub. As I have stated in the past, I found some bismuth split shots, and I use those exclusively now. I put the split shots 18-20 inches up the line, or sometimes farther, depending on the depth I am fishing and how much weight I think I need. The idea is to have enough weight to get to the bottom, but also to have it far enough up the line so it does not affect the action of the grub. If the weight is too close, it does not allow the grub to move freely, and that seems to make a difference in the number of fish I catch.
I also like to fish a 3-inch grub on a light, weedless jig head. I use a 1/8th ounce or so, with a single wire weed guard. If I am fishing something other than a rocky bottom, for instance an area where there are some weeds as well, I will opt for a light, weedless jig head. This still allows for a slow fall. Fish will often strike on the fall, so a slow fall gives a better opportunity for that.
I will work a grub slowly through the weeds, lifting the rod tip to move the bait, then reeling down to where I feel the bait again. “Slowly,” can be a subjective word and what I think of as slow may not be the same as what you think is slow. But the big thing is – the fish will make the decision, not you or I. They will tell us what they want.
One of the times that I will throw a grub on a baitcasting set up is when I am fishing it on a swing head. I use a ¼ or 3/8 normally, but depending on depth, I may go up to a ½ ounce if need be. I like a swing head because it helps with the natural movement of the grub. It also seems to come through a lot of different kinds of cover better than a head that does not move. As it hits stumps or weeds, it will mov out of the way as I am slow rolling the grub back to the boat.
Of course, another great use of a single tailed grub is as a swim jig trailer – or, really any jig. As with any trailer, the grub can be used to change up colors a bit, add a bit more action, or even add some flash. I feel like, when most people think about a single tail grub, they think of a swim jig. That said, I won’t go too heavy into it, but I like to use a regular worm and jig rod – medium heavy, and a 6.3:1 reel or higher, depending on what I’m fishing in and how much power I think I’ll need to get the fish out of whatever cover is around. When I’m fishing a lot of vegetation, I tend to go with braid, as that cuts through vegetation when I’m bringing the fish in. Depending on water color, I may or may not use braid at other times. If the water is gin clear, for instance, I will go with a copolymer or a fluoro-coat. I am not a big fan of full fluorocarbon around a lot of rock, because it tends to fray. And that is fine if that is what anglers like to use. They just need to be aware, as with all other applications, they will have to check their line much more often – or risk losing a big fish when the line breaks. Although I like copolymer, though I will use fluorocarbon. As I said, though, it is just important to check the line regularly.
A grub can also be Texas-rigged or used on a Carolina rig. Any technique where the bait is moving, or even being jigged up and down, can be a great technique to use a grub. While it seems to have found its way to the bottom of the tackle box for many anglers, those looking to get more fish in the boat are turning back to the tried and trusted single tail grub.
This time of year is never fun for anglers – I mean, fall fishing is incredible! But what comes after that… Meh. Before we know it snow will be flying. That said, it is time to winterize the boat and get it cleaned out for the season. I am always amazed at the amount of tackle I have accumulated over the summer.
I own a soft plastic bait business now, so on the surface it would seem like I would have fewer baits in the boat – because I can always make more of whatever I need in whatever color I want. But I think that’s the problem. I can make whatever I want whenever I want. There are times I come up with a color that I just “have to have” in the boat and there are other times that I am making a color for a customer’s order and can’t remember seeing that color in a certain bait in my boat.
Of course, that color in the exact bait in which I want it is usually in the boat, but likely stashed in a compartment or Plano box that I would not normally have put it in. It is all in there, but not to my knowledge. And, if I can’t find it quick the day before a trip while I’m charging up the boat, I figure I better make some so they have time to cure before I get out on the water.
“But there has to be a good way to organize it, isn’t there?” I can hear people asking. Of course there is. There are probably a hundred great ways to organize tackle in your boat or even in your tackle bag, for non-boaters. It seems, though, every time I think I have found the perfect way to organize things, something changes.
I might change up the baits I like to throw. I might change up colors. I might change who knows what. And, honestly, at other times, I might have no clue what I’m going to be throwing. Maybe practice did not work out for me. Maybe it’s a small tourney like a clubber and I did not get out to practice. I tend to like to use smaller tournaments like clubbers to train myself to think on my feet – what would I do in a big tournament if nothing I expected to work seemed to be the ticket.
Another issue is when we add different baits to those we make during the year. Well heck. Now I need at least a dozen of each of those in four or five different colors. I know, I know. I only use like two or three, but you never know, right?
No matter what the compartments of my boat looked like at the end of this year, there is one thing for certain: they will be so orderly and organized at the beginning of next year it will be crazy. And, by the end of the year? Well, I’m not going to make any promises.
Fall is a great time for swim baits. To be honest, I throw swim baits all year, but spring and fall are my favorite times to use this search bait. Swim baits allow me to cover a lot of water quickly. Even if the fish follow me back to the boat and do not take the bait, they still let me know where they are. I can always follow up with a jig or a soft plastic and pick up some of those hesitant fish that way.
In the fall, fish are chasing bait fish more often than anything. Yes, they will still eat crayfish, but as the bait fish migrate into the shallows and backs of creeks, bass will follow.
I like 3.5-to-4-inch swim baits, and I throw, and make, a variety of them. With most of these, I throw them on a weighted swim bait hook. I use a VMC hook, but there are a lot of really good ones out there. I found VMC years ago and it did exactly what I needed it to do. It performed well and I had no issue with hooksets, so I have never changed from that. I like the screw lock on this hook. It keeps the bait straight, but it can still move freely. One of the things about the way the VMC hooks are made is the weight can be moved. It can be moved a bit farther forward if a nose-down presentation is the ticket, and it can be moved back to keep the bait moving evenly.
I might use more of a nose-down approach when fishing along the bottom. This makes the bait look like a foraging bait fish. When I am fishing through or over vegetation, I opt for more of a centered weight approach.
A swim bait can be fished anywhere in the water column. The pointed nose allows it to go through grass, coontail, milfoil and other vegetation easily. It can be fished around and skipped under docks, too.
When skipping a swimbait under docks or fishing around docks, especially shallower docks, I prefer no weight at all. Instead, I will Texas-rig the bait and use it more like a soft jerk bait. I pop and jerk the bait around to imitate a dying bait fish.
A paddle tail swim bait on the back of a buzzbait is another great tactic. Here, my main colors are black and white. I tend to go for black if it’s a cloudy day and white when the sun is out full – but I have learned not to stick to that completely. The fish will tell you if you’re on to something or if you’re missing the mark.
I make a variety of swim baits, and I like different baits for different purposes. I like to fish my open pour 4-inch swim bait weightless in all depths but the very deepest conditions. These baits take a lot of plastic to make, making them heavy. I also love the tail action of these baits. The paddle tail movement is made even bolder by the very thin tail that extends from the body to the paddle.
I also make smaller swimbaits and I use those for some specific purposes. One of the things I do with a smaller swimbait is use it as a trailer for a swim jig. A swim jig has a bulkier, flashier profile than a swim bait alone. And a paddle tail swim bait creates disturbance in the water to let the fish know it’s coming.
Another way I like to use a smaller swimbait is on a Scrounger head. There are a number of these types of hooks on the market as well, and the particular one an angler uses is completely a personal preference.
A scrounger head is basically a front-weighted hook with a soft bill on it. I rig the swim bait on straight, so the hook is exposed. The bill on the bait makes it somewhat weedless, but it will still get hooked up in thick weeds.
For thick weeds, though, I downsize the weight and burn the bait over the weeds. I want the bait to just tick the top of the weeds as I crank it along.
In the spring and fall, I will usually use a longer bill, creating more of a wobble. I liken it to using a crank bait or spinner bait with a wider wobble in the spring and fall, and less in the heat of the summer. Obviously, there are times and angler should try both – basically any time you’re not getting bit and think you’re in an area with fish – and let the fish tell you what they want.
I feel like fish do not see the Scrounger head as much as they see other baits, making them a great choice when conditions are tough. I have caught more than my fair share of fish on a 3-inch swim bait behind a Scrounger head.
Another obvious way to fish swim baits is on an Alabama rig. I don’t fish the A-rig much, but it is fun when I pick it up. There is always the chance to hook up with more than one fish on any given cast.
Rigging a swim bait simply on a swim bait head can get bites, but it is something I rarely do. I seem to fish more in weeds and wood, and an open swim bait hook just gets hung up too often for me. In open water situations, however, a simple swim bait head, or even a swing head, can be another solid option.
The last use of a swim bait I would like to talk about is what should be a common one, but I don’t feel it is used to its fullest, either. That is on an underspin. The underspin adds a bit of flash and a bit more vibration to the swim bait. Both of these can help bring a reaction strike from a big bass looking for a meal. Underspins do not work well in heavy vegetation as they tend to get caught up, but around wood, docks and rocks, they are a great choice.
With all of these tactics, the fish will usually hit the bait, turn, and then you will feel the weight. Wait until you feel that weight and set the hook. Obviously, in the case of the buzz bait, this can be more difficult. I tend to want to set the hook immediately when the fish strikes. But the hook up ratio with a swim bait improves if you can wait just that second or two. But – wait too long, and the fish will be long gone.
My swim bait set up is usually a medium heavy rod, and I like a longer rod to get those longer casts. I use a medium heavy because that gives me enough back bone to get the hook set into the fish and get it to the boat.
For a reel, I usually use a 6.3:1 or a 7.0:1. You don’t need a super high-speed reel to be effective, but sometimes something in the range of 7.0:1 will allow you to crank the bait fast enough to keep it where you want to in the water column.
For line, I always use braid. I started out always using braid, and I will always use it. I have better castability and control with braid. It also has no stretch, which makes for better hook sets. I know some people use Fluorocarbon, and I suppose that is an okay option, too, but I like braid. Braid floats, which helps keep the bait higher in the water column. Second, braid cuts through vegetation. So if I am fishing in some weeds and hook into a fish, it is much easier to get the fish to the boat. I find, when using braid, I am able to get the fish to the boat much more often rather than “chasing” the fish down with the boat.
As far as colors, I think I am more particular with swim baits than I am with many other baits. I am not sure if it is a matter of catching the fisherman before catching the fish, but I feel as though it really makes a difference.
Black and white, especially as trailers, are always in my tackle box. But I also like bluegill, crappie and perch are solid options, in my opinion. This is really a “match the hatch” situation. Colors such as ayu and various shad colors all have their place in my tackle box as well. When putting eyes on my open pour swim baits, I almost always opt for red. Again, I think this is a confidence thing more than anything. I have no idea a fish can see the eyes on a bait before it hits it or not. But I can, and it makes it seem more lifelike, so I usually opt for the eyes.
In all, swim baits, fished a variety of ways, take up their fair share of real estate on the deck of my boat in the fall. They are versatile, cover a lot of water quickly, and will help you put more fish in the box.
Okay, not an actual jerk. I’m talking about soft jerk baits. These are another type of bait that seems to have fallen out of favor, but will likely make its way back into tackle boxes. The life of many soft plastic baits is incredibly cyclical. We all jump on a bandwagon because, let’s face it, we’ve seen it work for someone else. That someone else is usually a pro who is catching more fish than we are. So we leave our staple baits to try something new.
For some reason, the soft plastic jerk bait has not made its way back as many others have, but it would not surprise me if more people than I am aware of actually use this bait on a regular basis. When I started fishing tournaments, I fished as a non-boater. I still fish out of the back of the boat sometimes. One of the things I like about soft plastic jerk baits is that they are versatile – more versatile than a hard jerk bait. And I do not have to deal with treble hooks. I sometimes find treble hooks a bit more challenging when I am fishing out of the back of the boat, but I know that is not the true for everyone.
The point of a soft plastic jerk bait is to mimic a injured or dying bait fish. I don’t get too caught up in colors. I always have white and black, but I also have had good results with a baby bass or bluegill color. With the white jerk baits, I often change them up a bit with garlic scented markers. I might make the tail chartreuse and put an orange kill dot under the head of the bait. Does that make a difference? I suppose there could be arguments either way, but at times it gives me more confidence, so the bait “works better.” As the old saying goes, “you have to catch the fisherman before you can catch the fish.”
Just like a hard jerk bait, a soft plastic jerk bait imitates an injured or dying bait fish – an easy meal for a bass on the prowl. Soft plastic jerk baits can be fished in a variety of ways. One of my favorite ways to fish it is to Texas rig it weightless. I normally use this when I am working over vegetation. It works well through lily pads and can also be worked quickly over grass, milfoil or coontail that may be holding fish. The bait will dart back and forth and make enough noise to alert the bass a meal may be coming its way. The sound of a dying bait fish overhead to a bass is like the jingling of the bell on the ice cream truck to an eight-year-old. They can’t resist it. I will let the bait fall into openings in the vegetation, much like one would with a worm.
When working weed edges or over breaks, I start with the typical, “jerk, jerk, pause,” cadence and vary it from there as I get clues as to what the fish want. This is one bait I will keep in the water while I am doing things like messing with my electronics or going for a drink of water. If a fish hits while I’m doing something else, I know I need a slower presentation.
Skipping docks is another good use of a soft plastic jerk bait. I let the bait fall on a bit of a slack line to give it a more life-like action. If I am fishing particularly deep docks, I might put a split shot on the line. There are many good quality lead-free split shots on the market. I use a split shot because it can be added to and removed from the line without retying as I go to fish different areas.
How about the old “ball and chain?” Soft jerk baits are great on a Carolina rig. Really, they can be fished in any situation you would fish a worm, as I mentioned earlier. Letting this bait fish imitation rise and fall behind a 3/8 to ½ ounce sinker can be a great tactic. For those who like to throw a Carolina rig (and I admit I should throw one more often), a soft plastic jerk bait can be just the difference needed to get big bass in the boat.
When fishing deep, I will use a swim bait hook on my soft plastic jerk bait. While this does change the action a bit, sometimes that is okay and, to be honest, I am not patient enough to let a weightless jerk bait fall into 15-20 feet of water. It can be used I any way I would normally use a swim bait, too.
Another way I like to use a soft plastic jerk bait is as a swim jig trailer. It has a little bit longer/bigger profile than a grub, for instance, and sometimes that bigger profile is what the fish want. It can be slow-rolled along the bottom or fished a little faster anywhere in the water column. I like to use them on crappie or bluegill colored jigs, but I will use them on a white or black swim jig, too, depending on water color. Again, I think it has a lot to do with what the angler is comfortable fishing.
I use a 3/0 or 4/0 hook when rigging a soft plastic jerk bait weightless or weighted. I have no issue using the smaller 3/0, but a 4/0 will help the bait fall a bit faster. It’s all about the fall rate, and I vary that depending on what the fish are telling me.
As far as line, again, I feel this is a versatile bait. Monofilament and braid float and fluorocarbon sinks. Mono-based copolymers will float. Fluro/Mono hybrids will sink. Personally, I do not give too much credence to that in any situation where I am fishing something weighted. The weight will make the bait sink, obviously. That is the reason for using it. Depending on the line diameter, it may make more of a difference, but I do not feel it is as important as when I am fishing weightless. I choose line for this application based more on what I am fishing. Fluorocarbon is not the best around rock. Braid will slice through grass and other vegetation where the others may not.
My go-to for soft plastic jerk baits is a 5”. I make a 5” and a 6”, but I have been throwing the five so long that I have not given the six a fair shake. I sell a good amount of 6-inch baits, so I know I will eventually break down and see what that is all about, but for now I will stick with the five-inch. It gets results. And I can’t argue with a bait that gets results… but what if …..
Summer is the time for a 10-inch worm. But many anglers don’t feel comfortable with baits that big. We all hear “big baits, big fish,” but I have caught all sizes of fish on a 10-inch worm. Of course, I’ve caught some big fish on the same worms, landing the big fish for more than one club tournament on them. The best 10-inch worm, in my opinion of course, is a ribbon tail. They have the most action and create a lot of disturbance in the water that will attract fish.
The thing with a 10-inch worm is that, because many anglers don’t throw them, fish rarely see them. Throwing a bait most anglers are not using can have great results. One of the things I like about big worms is how versatile they are. I can fish from two feet to 22 feet with a 10-inch worm.
With big worms, I tend to use big hooks. A 7/0 offset worm hook is usually my go-to. I know a lot of people use smaller hooks with a good deal of success, however. As one old-school angler once told me, if a fish grabs the worm by the tail, it doesn’t matter how big the hook is. He uses a 3/0 hook for that reason. And he is successful with that philosophy, so I can’t very well say he is wrong. A fish will usually take the worm from the front anyway, meaning a smaller hook should work just fine and because it is lighter, it will affect the action of the worm less. I get the idea – I’m just not sure how much faith I have in it. I would say whatever hook an angler is comfortable with is going to be just fine. I tend to use a worm hook when I’m fishing in grass or heavier cover. It helps the worm come through that type of cover better. When I’m fishing ledges or drops, I might use a EWG hook, but honestly I don’t feel it’s necessary. A 10-inch worm is not a thick piece of plastic, so an offset worm hook is my go-to. One thing I do not do is peg the sinker.
No matter the depth of the water, I do not want to sinker pegged as it can get in the way of getting the hook set into the fish if it is pegged directly to the eye of the hook. If I do use a bobber stop for any reason, such as if I am just changing up a bait quick from another soft plastic I had on the same rod, I put it at least six inches from the hook. In deeper water, with the sinker not pegged, it gives the illusion of something chasing after something else, which can attract the attention of my target fish, a big bass. No matter the depth I am fishing, I Texas-rig the worm, keeping it weedless, and if I have a bobber stop on the line, it is away from the sinker and hook.
So now we get to the versatility factor. A 10-inch worm is a great bait for ledge fishing as well as fishing shallower vegetation such as grass or lily pads. As I said, I have fished this bait up to 20+ feet deep, and I have been beat in tournaments by an angler a time or two when he made that change that I missed and started catching fish in deep water with a 10-inch worm. In this scenario, I would definitely not peg the sinker. Again, the allure of a bass’ forage chasing its own forage to the bottom is often times too much for a bass to take.
When fishing deep, off ledges, there will usually be a “sweet spot” on the ledge. When I find one of those spots, I fish the worm more thoroughly through that area. There will often be more than one or two fish in the same spot. I use my electronics to look for bait fish activity as well. Bait fish mean a high likelihood of bass in the area. When fishing deep, I usually use at least a 3/8 ounce sinker or up to ½ ounce. This helps get the bait to the bottom and using a tungsten weight allows me to feel the bottom better. In deeper water especially, once I catch a fish, I will triangulate that spot using visual keys from the shorelines or markers in the water such as a fallen tree. I will make the same exact cast at least a few times to determine where the exact “spot on the spot” is on that ledge. Once I find a depth at which fish are holding, I will use a depth highlight on my electronics to find other places around the lake that set up just like the one on which I was catching fish.
In shallower water, I might go down to ¼ ounce on the sinker or at times not even use a sinker. I would opt to leave the sinker in the tackle box when fishing areas with lily pads, for instance. Just as with any other weightless worm, this allows me to move the worm along the top of a lily pad and let it drop slowly into the holes between the pads. Some anglers use a heavy mono line, such as 40-pound test, to run through the bait and the eye of the hook to keep the bait pegged to the hook. This does not allow the bait to slide down on the hook. Products such as the Never Slip Bait Tape are good options here as well. For me, I don’t worry about that. If I need to take a bit of the head of the worm off because it was ripped or damaged in some way, I can do that at least one or two times before the bait shortens up too much.
Fishing grass edges is also a place where a 10-inch worm will shine. When pitching into grass, watch your line as the bait is falling. Often a fish will grab the bait before it hits the bottom and you will simply see your line take off in one direction or another, or it will just get slack. If the bait gets to the bottom, lift the rod and let it drop on semi slack line. Lift up, let it fall back down. Keep the rod in front of you to have as much power as you can to set hook. Don’t lift rod too high. Once the fish takes the bait, set the hook on a semi-slack line. If the sinker happens to get into the fish’s mouth, it may have its mouth closed around the sinker. With a tight line, all you have done is turn the fish’s head. With a bit of slack in the line, you will likely pile drive the hook into the fish’s mouth. If need be, you can drop your rod tip a bit to create the slack you need in the line, then set the hook hard.
As far as gear, I don’t believe you need anything super special to throw a 10-inch worm. Long casts can be important, so a 7 foot rod is usually my go to, a medium heavy fast action, to me, is best. That gives a good backbone to get the fish through any heavy cover I might be fishing, and also gives me good hook penetration. I believe these rods are best suited for worm fishing, but they also have many other uses for other applications.
As far as reels, again, I do not feel you need anything super special. Even a high-speed reel of 8:1 or 9:1 is not a necessity. Anything over a 6:1 or even a 7.5:1 is fine. You won’t be speed reeling with a big worm, so don’t worry about specialty equipment. For me, if I am fishing heavy cover, I might go to a 7.5:1 just to get the fish turned and headed toward me after I hook up with it.
Now for line. My favorite for worm fishing, and yes, I completely understand how “old school” this is, but I prefer copolymer for worm fishing. If I am in super heavy cover, I will go to braid. I always use 65 pound braid or heavier, but an angler could certainly use 50 pound or whatever their normal braid is. Copolymer is a good all-purpose line and it holds up a lor better than fluorocarbon. I don’t use fluorocarbon when fishing a bit worm, if possible. If I wind up using it for any reason, I am always sure to inspect the line often to be sure it is not fraying. I can say the same with braid in situations with a lot of rock. Rock can fray braid, so I check that often as well when in those situations. Copolymer is better in rocks, so, again, it is usually my go-to line for a big worm.
I don’t get to stressed out about learning another knot, either. I know a lot of old-school anglers that insist on a San Diego jam knot for a big worm. If you don’t know the knot, don’t stress it. I usually use a Palomar knot, which is what I use for almost everything. A unit knot is a good choice as well. The point is, whatever knot you tie that does not fail and in which you have confidence is going to be a good knot to tie in this case as well.
A 10-inch worm can also be dragged along the bottom. It can also be brought through vegetation such as coontail to create a swimming motion. When swimming the worm it creates a lot of vibration in the water, which will alert the fish that something is coming that may be a decent feast.
I do not get super concerned about colors, but I do have a few favorites. Black is my main color 10-inch worm that I use. But I also like black with purple flake. June bug is a good color, as is tequila sunrise. As with any other bait, clearer water will call for a bit more natural colors. Darker water will allow you to use brighter colors. For the most part, it is the vibration and the silhouette of the bait that is going to draw the strikes.
When fishing gets tough in the heat of the summer, don’t be afraid to “go big.” And a 10-inch worm is the perfect way to go big and get those big fish to the boat.
Join me tomorrow, with a bunch of my friends and fellow outdoor business owners, at the Fishing Swap Meet at Maloney’s Bar and Grill in Kaukauna, WI. We will all be set up in the Venue and talking fishing, camping, hunting – you name it! If you are getting ready for fishing season (and who isn’t, right?), be sure to stop in and talk with all of us.
FLaG Baits will be onsite with some of our new colors and styles of baits as well as tried and true favorites. We will be there from 11 a.m. to 4 p.m. Admission to the event is free, and set up by Tony Mollica.
Enter to win a $25 gift certificate from FLaG Baits. It can be used on stock colors or special orders. You are only limited by your imagination when you shop with us! We have quick turn around times and offer just about any color, scent or glitter you can imagine.
To enter, just guess the number of baits in the Tote of Baits. If more than one person guesses correctly, we will assign each person a number and use a randomizer app (live on Facebook) to chooses a number. If the number of baits is not correctly guessed, we will take all of those who are closest, without going over, and pick a winner using the same procedure.
Get yourself out of the house for a bit and great ready for fishing season! See you tomorrow at Maloney’s!
As you will see, looking around the site, we are under construction a bit. I am revamping the Bait Co. pages to separate them by type. I will be updating our stock colors, but please know we have the ability to make most any color you normally use. We have laminates and swirls at a small extra charge. We have a new variety of scents, for those who like scents as well. I will be posting all of those in the next few days.
With all of the political mess in the country right now, I think we could all use a little more thought toward fishing and the other things we love to do. I will say I am not much of an ice fisherman, but I almost want to get out there just to give it a try again after years away. Almost.
But, for now, I think I’ll concentrate on making some awesome baits for all of you to enjoy during your next open water season. 2020 did not start off the way tournament anglers would have liked, with DNR stipulations on tournaments meaning many were cancelled or postponed early on in the season. Hopefully we will not see a repeat of that in 2021. If we need anything right now, it is to spend some time outdoors to clear out heads.
Thanks for checking out the website and for looking at our baits. If you have any questions or want more information about other things we can do for you, feel free to send an email, text, message, homing pigeon – whatever works for you!